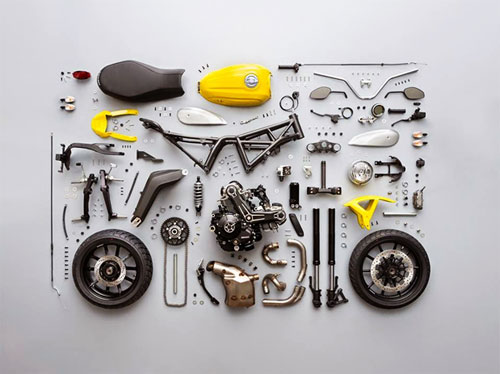
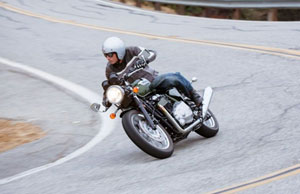
Safety Tips
Tips to make your motorcycle run
Safety Tips
Tips to make your motorcycle run forever
1. FOLLOW THE RECOMMENDATIONS IN YOUR MANUALS
It may be hard to admit, but—believe it or not—the original manufacturer probably knows more about your motorcycle than you do.
Luckily, factory engineers are happy to share much of what they know about your bike in your owners manual. It will advise you on oil type, maintenance schedules, service procedures and more. Read it, study it, and memorize it.
2. BREAK IT IN RIGHT
The most critical miles of your motorcycle's life are the first few hundred, then the next couple thousand. If you don't treat your bike right during these early stages, you could regret it later.
Each bike comes with its own list of guidelines to follow for break-in. Some boil down to, "Ride it gently," while others can be complex programs that involve limits on maximum RPMs for a certain number of miles.
Some bikes even call for one type of oil to be used for break-in, and another after that.
Where do you find this information? Your manual.
3.CHANGE THE OIL
You hear it all the time: Scheduled oil changes—of the right oil—are the best way to make your engine last.
That's because it's true.
Every motorcycle engine has lots of hard parts that whirl around at frenetic speeds. And the only thing that keeps them from grinding themselves into metal filings is a thin layer of quality oil. When oil breaks down, it can't do a quality job.
So change it often, according to the manufacturer's recommended schedule—or even more often if you ride in dirty or dusty environments.
What kind of oil should you use? That can be a heated question, particularly if you frequent many enthusiast websites, where you can encounter a dizzying array of recommendations about what viscosity, specification (car or motorcycle) or type (conventional or synthetic) of motor oil is best.
Your best bet? Check your owners manual.
4.CLEAN THE AIR FILTER
What goes in your motorcycle doesn't always come out. And a lot of what goes in passes through your air filter.
That means if your air filter isn't clean, or, in some cases, properly oiled, you could be cutting off airflow to the cylinders and even allowing in foreign abrasives (dirt, dust or worse), where they can grind away at your valves, internal bearings and cylinders.
So do yourself a favor. When it comes to air-filter maintenance, follow the recommended schedule as a minimum. And if you ride in particularly dusty or dirty environments, clean or replace the filter more often.
5.AIR UP
Running the wrong air pressure in your motorcycle tires can negatively affect everything from fuel mileage to handling. It's not only wasteful, it's downright dangerous.
By maintaining the correct air pressure in your tires (check it once a week with a reliable gauge), they will last longer. And considering they are your bike's sole connection to Mother Earth, the rest of your bike will thank you, too.
6. KEEP YOUR BEARINGS
The rule here is simple: Grease your bearings.
New dirtbike buyers pick up this habit early, since many motocross bikes roll off the showroom floor already needing a healthy slathering of grease in areas such as the steering-head bearings and suspension linkages. But street riders need to keep their bikes lubricated, too. While the sealed bearings on modern streetbikes are relatively maintenance free, exposed areas such as suspension linkages need routine care.
Even if you grease religiously, the time will come when you'll have to replace key bearings. So check them periodically.
You can test your steering stem bearings by raising the front wheel off the ground with a stand. If you feel any notchiness when you turn the handlebars, or notice any play when you push on the fork back and forth, replace the bearings.
Likewise, if you feel any play around the front or rear axle, the wheel bearings need to be replaced immediately.
Another critical pivot point is the swingarm. It shouldn't move side-to-side.
The scary thing about bearings is that when they start to go, they go fast—sometimes with catastrophic results. Never put off replacing a bad bearing.
Also in the lubrication category, many bolts benefit from a bit of anti-seize coating when re-installed. Examples include the axles, swingarm bolt, linkage bolts and motor-mount bolts.
7. WATCH YOUR DRIVETRAIN
Fresh oil and a clean air filter generally will keep your engine and transmission running right, but that's only two-thirds of your bike's mechanical make-up.
The rest is the drivetrain—the chain, belt or shaft that transfers power from your transmission to your rear wheel.
Depending on what type of final drivetrain you're running, you'll want to keep an eye on chain stretch, sprocket wear, belt cracking, or the condition and amount of oil in the shaft housing.
Chain drive systems generally are the most maintenance-intensive, although if you run a sealed chain (O-ring or some variation) and don't run aluminum sprockets (which are light, but wear relatively fast), you'll probably find a periodic minor adjustment is all you need.
8. PROTECT YOUR CHARGE
A new battery starts dying the second you use it. However, its life can be a long one if you keep it and your charging system in good shape.
The best thing to do to extend battery life is to keep it charged during downtime, preferably with a trickle charger.
The other major issue with batteries is letting the electrolyte solution get too low. Low levels expose the internal plates, reducing capacity and increasing heat.
If you can, eliminate this problem with a sealed, maintenance-free battery.
9. LOOK FOR QUALITY
Every one of us enjoys tricking out our motorcycles, adding this or that to change performance, up the style factor or otherwise make it our own.
However, when considering aftermarket parts, evaluate whether they have at least the same workmanship standards of original equipment. If not, they may not last as long.
Bottom line: Choose your bling wisely.
10. CHECK, PLEASE
If it works for airplane pilots, it can work for you.
We mean, of course, going through a pre-ride checklist. That's the best way to find little problems before they become big ones.
Bikes vary (yep, consult your manual), but, generally, you'll want to check: the level of both the motor and transmission oil; tire air pressures; fuel or brake-fluid leaks; bolt tightness; electrical switches and controls.
If something is wrong, fix it.
11. RIDE IT RIGHT
It may make you feel like a race hero if you power-shift your motorcycle without feathering the clutch or backing off on the throttle, but your transmission will grumble—literally.
Likewise, braking easy, accelerating steadily and turning smoothly will help lots of parts last longer.
You can be rough with your bike, but you'll need to be sure you're ready to do more maintenance.
12. IF IT AIN'T BROKE...
Just ride it! Too often, we get anxious to tinker with our pride and joy and start turning wrenches just to scratch that itch.
Generally, you're better off just enjoying another long ride.
Which is, after all, the whole point.
- + 1.How to Negotiate Decreasing-Radius Corners
-
Perhaps no corners strike greater fear in the hearts of motorcyclists than decreasing radius corners. However, the corners themselves aren't really the cause for the concern. It's the surprise of entering an unfamiliar corner, setting your speed and your line, only to suddenly have the rules change midway.
Remember that, despite the surprise, if your bike isn't dragging hard parts, you have the ground clearance to lean the bike over even more — probably more than you think.
Before we discuss the challenge of decreasing radius corners, we should quickly review an easy one. This will make sure we have the same techniques in mind. In an idealized constant-radius corner, the rider can see from entry to exit. So, the bike's approach would be wide at the entrance, and setting the appropriate speed before the turn-in point.
A rider should look through the corner, initiate the turn, and begin rolling on the throttle. Rolling on the throttle settles the suspension and keeps the bike from falling into the corner as the bike heads towards the apex. After the apex, acceleration can increase as the bike begins to stand up, putting a larger footprint on the pavement and following its line to the outside of its lane at the exit of the corner.
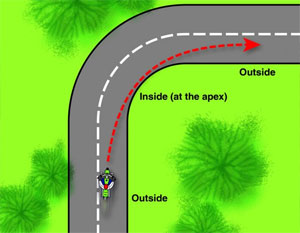 The ideal line through a constant radius curve starts wide at the entrance, tightens to the apex, and then exits wide.
Photo courtesy of the Motorcycle Safety Foundation.
The ideal line through a constant radius curve starts wide at the entrance, tightens to the apex, and then exits wide. Photo courtesy of the Motorcycle Safety Foundation.
If the entire corner could be seen at the entry, the tightening of a radius could be planned for from the beginning — just like with our idealized corner. So, in order to address the fear of the decreasing radius, we should look at the proper way through the corner and then backtrack to see how we can apply this knowledge to corner entry — even when we don't know a decreasing radius lies ahead.
Motorcycle Cornering Clearance – What To Do When It Runs Out
If we treat a decreasing-radius corner like a constant-radius one, the line takes us off the road as the curve tightens. Holding a wide line gives us maximum flexibility to modify our line as the corner's radius tightens. If you're taking the classic line through a corner and the radius tightens — even just a little — it will have the same effect as early apexing a corner: The bike will run wide at the exit. So, when approaching a decreasing-radius corner, the best tactic for a street rider would be to set the entry speed for the tighter portion of the curve, hold a wide line at the entrance of the corner, and dial in more lean until the line heads towards the apex of the tightened radius.
Newer riders will want to set a slower speed at the actual corner entry. For more advanced riders, trail braking through the initial corner to the tighter section can be utilized as long as you're cognizant that traction for braking is reduced by cornering forces. Smooth application of the brakes is paramount, as an abrupt spike in brake pressure — or abruptly chopping the throttle — can cause traction loss and send you tumbling.
While traction for braking in a corner is limited, entering the corner trailing the brakes and having the bike's weight shifted on to the front end actually helps with steering input. The fork's rake angle decreases as it compresses, making the bike respond more quickly to steering input. You have also compressed the tire, giving it a larger contact patch and more traction.
However, the harder you're cornering, the thinner the line is between having enough grip to brake while leaned over and a low-side crash. Once initiating your line in the tighter section of the corner, begin accelerating for the exit as you normally would.
In the example above, we assumed we could see the entire corner and, therefore, could plan accordingly. However, on the street, you will frequently enter corners where you can't see the exit. While you can draw clues for where the corner goes from trees or telephone poles or fence lines, these can be misleading. (Have you ever been following a row of telephone poles for miles only to see them go straight off into a field while the road makes a turn?)Proper Motorcycle Lane Positioning
So, when riding on an unfamiliar road, you should always hold at least 20 percent of your skill set, traction, and ground clearance in reserve for the unexpected — which could come in the form of a tightening radius, an obstacle, liquid, a bicyclist, or any other of the myriad of things you might encounter in the real world.
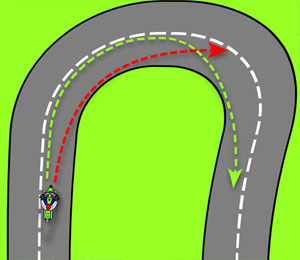
 The rider's wide initial line gives him the time to detect a decreasing-radius turn and begin tightening his line.
The prudent street rider will set road speed based on the radius of the corner at its entry (while keeping that 20 percent reserve) but will maintain a wide line. Once the corner's exit is spotted, the final line, which clips the apex, can be selected. A wide line gives the maximum view of the road ahead, increasing the time to react to the unexpected. Even while holding the wide line, you can accelerate through the corner to settle the suspension as you normally would. If a corner begins to tighten up, you have that reserved cornering clearance to dip in to.
The rider's wide initial line gives him the time to detect a decreasing-radius turn and begin tightening his line.
The prudent street rider will set road speed based on the radius of the corner at its entry (while keeping that 20 percent reserve) but will maintain a wide line. Once the corner's exit is spotted, the final line, which clips the apex, can be selected. A wide line gives the maximum view of the road ahead, increasing the time to react to the unexpected. Even while holding the wide line, you can accelerate through the corner to settle the suspension as you normally would. If a corner begins to tighten up, you have that reserved cornering clearance to dip in to.
 The rider has chosen his line through the tighter section of the curve and is already looking ahead to the next corner.
If you suspect the changing radius will ask for more ground clearance than you have, you can modify your speed — or prevent it from increasing — by lightly applying the rear brake and maintaining a neutral throttle. If the corner requires that you slow even more, roll off the throttle — do not chop it — and smoothly apply the brakes. When practicing this technique, notice how, when you decelerate while leaned over, your line will naturally tighten, aiding in achieving your desired path through the corner. After you've set your new line, treat the corner's exit just like every other corner.
The rider has chosen his line through the tighter section of the curve and is already looking ahead to the next corner.
If you suspect the changing radius will ask for more ground clearance than you have, you can modify your speed — or prevent it from increasing — by lightly applying the rear brake and maintaining a neutral throttle. If the corner requires that you slow even more, roll off the throttle — do not chop it — and smoothly apply the brakes. When practicing this technique, notice how, when you decelerate while leaned over, your line will naturally tighten, aiding in achieving your desired path through the corner. After you've set your new line, treat the corner's exit just like every other corner.
One other tactic for solving the decreasing-radius corner dilemma should be mentioned, although it applies more to the track or roads with which you are familiar. When you know a corner has a decreasing radius before you enter it, double apexing a turn essentially turns the corner in two with each being dealt with separately. However, we'll discuss this technique in a future article.Motorcycle Downshifting Techniques
Decreasing-radius corners are just another part of the enjoyable challenge of riding motorcycles. If you practice these techniques, you'll have them to draw on in an instant when a blind curve becomes more challenging than it initially looked. - + 2.Motorcycle Downshifting Techniques
-
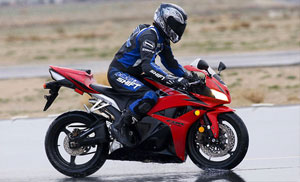
One of the hallmarks of proficient motorcyclists is the smoothness with which they apply the controls. Downshifting and braking are two of the skills that require the most finesse. Get ham-fisted with either, and you will display (and anyone riding with you will see) the telltale bobbing of an unsettled chassis – or worse, crash. This is why novices are recommended to master the basics of both braking and downshifting separately before trying to cram them together while rushing headlong into a corner.
In its most basic sense, downshifting consists of just three things: pulling in the clutch lever, pressing down on the shifter, and letting the clutch lever back out. However, there's the important issue of matching the engine speed to the road speed. Most beginning rider courses emphasize a slow release of the clutch lever which allows the engine speed to rise to meet the road speed.
But do it too abruptly, and you'll get a lurch – as if you briefly mashed on the rear brake. In extreme examples, this can lead to rear wheel hop, which explains why many sport/racing-oriented motorcycles have a slipper clutch. While a slow-release clutch method of bringing the rpm up to the right range is an effective tool – and teaches good clutch control – it isn't terribly efficient. Multiple downshifts will take something just short of an eternity.
Proper Motorcycle Lane Positioning
As riders progress up the skills curve, they begin to combine a faster clutch release with a blip of the throttle. When it works, the downshift is so smooth as to be imperceptible. If the revs drop and then rise again as you let out the clutch, you need to give a little more throttle before releasing the clutch. If the bike surges forward, give less throttle. Either way, the chassis is upset, and your nice, tidy line through the corner becomes more difficult.
 While maintaining a constant pressure on the brake, let your fingers slide over the lever while you blip the throttle for the downshift.
While you practice matching the engine speed to the bike's road speed, make the corner entries easier by separating the braking and getting it done early. Practice downshifting at every opportunity you get until you no longer have to think about how much throttle is required until the process becomes second nature.
While maintaining a constant pressure on the brake, let your fingers slide over the lever while you blip the throttle for the downshift.
While you practice matching the engine speed to the bike's road speed, make the corner entries easier by separating the braking and getting it done early. Practice downshifting at every opportunity you get until you no longer have to think about how much throttle is required until the process becomes second nature.
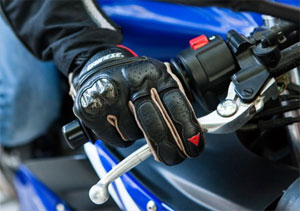
Now the real fun begins: combining the braking and downshifting. If you weren't already riding with two fingers on the brake lever at all times, you need to be doing it now. Also, placing your hand in the proper position on the grip will make the process easier. When the throttle is completely closed, your wrist should still have a slight downward bend – not choked-up drag racer style – as you rest your fingers on the brake lever.
 Having the wrist in a level or slightly down position makes it easier to operate the brake and throttle simultaneously.
Before you practice this technique on the road, sit on your bike in your driveway and rehearse maintaining a constant pressure on the brake lever while rolling the throttle on and off. Remember, although it's a challenge to modulate the brake and throttle simultaneously, you will be able to greatly compress the distance it takes to slow and downshift once you've mastered the skill.
Having the wrist in a level or slightly down position makes it easier to operate the brake and throttle simultaneously.
Before you practice this technique on the road, sit on your bike in your driveway and rehearse maintaining a constant pressure on the brake lever while rolling the throttle on and off. Remember, although it's a challenge to modulate the brake and throttle simultaneously, you will be able to greatly compress the distance it takes to slow and downshift once you've mastered the skill.
While the right side of your body is handling the brakes and the throttle, the left side of your body will be busy shifting gears and modulating the clutch. Here's one secret to make downshifting easier: You only need to pull in the lever far enough to disengage the clutch plates. Pulling the lever all the way in is wasted effort that makes it more difficult to shift smoothly.
Motorcycle Riding in the Wind and Rain
Some riders make the movement easier by covering the clutch lever with two fingers. Bumping the lever against your other fingers will remind you when you've pulled it in too far. (To make sure you fully disengage the clutch at a stop, continue to use all four fingers.)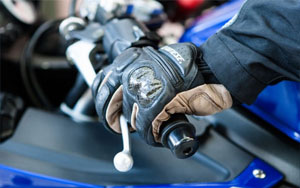 The clutch lever has been pulled in too far once it hits your fingers. Efficiency of movement makes for smoother downshifts.
There's a trick for your foot, too: Although downshifting appears to be simultaneous to the clutch action, you'll want to preload the shifter by pressing down on it just before you disengage the clutch so the transmission will slip right into the next gear. Release the shifter as you normally would when the clutch is fully engaged. The process is the same no matter how many gears you're going down through. Just let the clutch out fairly quickly between each shift. Don't tap down more than one gear while the clutch is in. Getting the downshift(s) done early in the braking will help mask any slight mistakes you make in matching the engine speed. This also lets you focus on setting your corner entry speed and getting off the brakes at the proper time.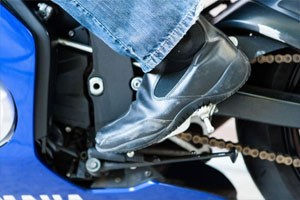
The rider's toe is pressing down on the shifter against the transmission's resistance. As soon as the clutch is disengaged, the lever will snick it into the lower gear.
Eliminating unnecessary movement from gear changes will help downshifts go much smoother. For clutch operation with a minimum of finger movement, make sure the point of full clutch disengagement is as far out from the grip as possible while still allowing for 2 to 3mm of freeplay at the end of the lever. Similarly, the gearshift lever should be set so that you don't need to lift your foot off the peg to press down on the shifter, but don't set it so low that it compromises upshifts.
How to Load your Motorcycle Becoming proficient in simultaneous braking and downshifting will pay dividends in the city, highway and track. By being in the correct gear for your speed, you will be able to motor away from trouble around town or stabilize the chassis for the acceleration from a canyon road's corner exit. All it takes is practice.
Smoothly braking while downshifting is perhaps the most difficult motorcycle skill to master. Doing it in the wet earns bonus points.
- + 3.How to Load your Motorcycle
 Smoothly braking while downshifting is perhaps the most difficult motorcycle skill to master. Doing it in the wet earns bonus points.
Becoming proficient in simultaneous braking and downshifting will pay dividends in the city, highway and track. By being in the correct gear for your speed, you will be able to motor away from trouble around town or stabilize the chassis for the acceleration from a canyon road's corner exit. All it takes is practice.
The right helmet can save your life during the most terrifying 30 seconds you've ever experienced. The wrong helmet can make you miserable on an uneventful 10-minute ride. Our step-by-step guide will help you choose the right helmet for you.
So you got yourself a motorcycle! Congrats! Now you need to buy some gear and you've decided to start with a helmet. Most people start here because they are either a) smart, or b) their state requires a DOT-certified brain bucket. But, wait! There are so many to choose from!
How could you possibly decide, and what do all these things like EPS liners, Venturi effects, Pinlock lenses or fiberglass/composite shells even mean? Let's boil it down to a process and hopefully by the end you won't have a headache from thinking about it... or from wearing the wrong kind of helmet.
Getting the right fit
"I came here to look for some smokin' hot graphics, not talk about expanded polystyrene! Also, when you say 'round oval' is that just a smooth way of telling me I have a fat head?"
Getting the ideal fit means considering head shape, as well as head size. Some helmets make it easier by offering easily replaceable interior pads of different sizes to fine-tune the fit. Figuring out what kind of noggin you have will help you narrow down the choices and find a helmet that's comfortable on your own unique head.
What is my head shape?
Everybody's head is a bit different, but we are all generally egg shaped, falling somewhere between round and oval. For convenience, we divide this range into three main categories: round oval, intermediate oval and long oval. Modular (flip-face) helmets are mostly round oval, due to the hinge mechanism, though newer technologies are now allowing them to fit intermediate shapes better. Your head shape can be determined by using a mirror or having a friend look down on your head from the top. Extreme shapes should be readily apparent, but if you are not sure, you likely fall into the intermediate oval category (this is the most common). Keep in mind that the length or shape of your face, or the pudginess of your cheeks doesn't affect headshape.
A helmet that is the wrong shape will cause pressure points on your forehead (too round) or the sides of your head (too oval). When you buy a new helmet, we recommend wearing it for 30 to 45 minutes before using it on a ride to check for pressure points. These hot spots may not be immediately apparent but can grow into painful problems over time. Remember, if it goes out on the road it's yours, so make sure to double check fit before wearing it on your bike. The most important aspect here is the crown of your head. Cheekpads are often replaceable and do not determine shape or size.
What is my head size?
Measure your head with a cloth tape measure around your head from just above your eyebrows to the thickest point in the back. This circumference, usually listed in inches, can be cross-referenced with the size chart on any helmet. A helmet that is the wrong size will either be too loose and move around on your head too much or will be too tight and not sit down completely on your head, causing a high fit or simply pressure all around the crown. A correctly sized helmet will move slightly, but will pull the skin on your scalp and face with it, preventing rotation or large movements.
How can I adjust the fit?
Many helmets have replaceable cheekpads and liners that will allow for adjustment of the interior shape and fit of the helmet. Beyond switching out these items or using these features, any alteration to the inside of the helmet will likely result in loss of warranty and risks compromising the integrity of the helmet. Your helmet should feel equally snug around the crown and a good bit tight in the cheeks. Generally, a new helmet out of the box should fit snugly because it will become a little looser after months of use. Head liners typically only break in about 5 percent, while cheekpads often compress about 15 percent to 20 percent over time. A snug fit is good unless you are developing a point or area of pain..
How to fit a motorcycle helmet
Choosing a helmet configuration
Now that we've addressed the critical issue of fit, it's time to decide what kind of helmet to buy. Let's start at the beginning (this is Moto 101, after all) by talking about the different categories of helmets. Then we'll consider how those different kinds of helmets work for different kinds of riders, riding and motorcycles.
It's an absolute must that a worthy long-distance touring helmet does a handful of things extremely well. Balance, ergonomics and low sound levels are of utmost importance, since the rides will generally be longer and any discomfort only becomes magnified after hours in the saddle. Ventilation is critical in hot weather and the upright riding position of most touring bikes works better with some venting configurations than others. The vents should be at the top of the head, most effectively flowing air when the rider is straight up. You will no doubt see upgraded safety certifications, optimal creature comforts and futuristic materials in shell construction.
Modular motorcycle helmets have skyrocketed in popularity in recent years as a growing number of riders seek more versatility from their lids. Designed to be worn in the full-face configuration, with the face shield and chin bar in place, or as an open-face helmet, with the chin bar lifted up, modular helmets are extremely popular with the ADV and sport-touring crowds. At the base level, all modular helmets have a chin bar that can be flipped up. Both of these helmets have removable visors and chin bars and can be configured multiple ways. It's important to consider the level of versatility you desire when buying a modular helmet, as the chin bar systems, face shields, and occasional sun visors vary from helmet to helmet.
High-visibility gear is a growing trend in the motorcycle gear universe. Hi-viz yellow and orange are two of the most attention-grabbing colors in the visual spectrum. Hi-viz motorcycle gear gives the safety-conscious rider the best chance of being seen by other motorists. There are twice as many motorists on the road as there were 20 years ago and staying safe on two wheels continues to increase in importance to many riders
It should be noted that half helmets and three-quarters or open-face helmets are inherently less protective, due to the lack of coverage in the face and the jaw. However, these helmet categories offer their own advantages, such as better visibility, more airflow, less weight and a more intimate connection with rain, hail, bugs, dirt, and the smell of freedom! All jokes aside, you are the only person who can set your priorities when it comes to riding gear. Make sure you understand the plusses and minuses involved, keeping safety and riding experience in mind, and we'll help you make an educated decision from there.
Now that we've looked at different categories of helmets, let's take a step-by-step process to determine which one is right for you.
What kind of bike do you ride?
I know, it's ridiculously cool, it's got two wheels, and it goes faster than Superman on a sunny day, but let's home in on some specifics.
What's your posture on the bike? An upright riding position, like you find with many touring bikes, means that you don't lean forward at all (or perhaps lean back slightly, in the case of cruisers). A touring helmet usually works best with this riding position.
Sport-touring bikes and some standards put the rider in the three-quarters posture, meaning you are leaned slightly forward. The range of variation here is wide, because some bikes have windscreens while others are naked. These riders have the most flexibility of choice and may be happiest with anything from a touring helmet to a dual-sport or race helmet.
Sport bikes put the rider in an aggressive full tuck position. Aerodynamics become more important, especially at the higher speeds on the track. Sport or race helmets are designed to vent best in the full tuck riding position. Some use a spoiler for aerodynamic reasons, too.
What kind of riding do you do?
“Dude, my motorcycle is my freedom! I can go anywhere, anytime, all the time - booyah!” Well, sure, if you really wanted to you could probably get your chopper over the curb and out to the pine barrens. Or, you could probably push your ADV/touring bike to do 120 miles an hour. Motorcycles are able-bodied and flexible creatures, but let's be practical. What kind of roads do you plan to ride? How long are your rides? How many months a year do you ride?
Year-round commuters should look at helmets with adjustable features such as easy-change faceshields, a drop-down sun visor or a photochromatic shield. A weekender canyon carver may be more concerned with ventilation and awesome graphics. A long-distance tourer will need maximum comfort and quiet. For off-road riding, dual-sport helmets give you the option of using goggles or a faceshield, depending on conditions.
Generally speaking, the more time you plan to spend in your lid, the more you should invest. If you plan to commute every day and your trek is 45 minutes or longer, you are going to become intimately acquainted with the inside of your helmet. It should have a removable and washable liner, comfortable cheekpads, and an easy solution to changing lighting conditions. We've already said it, but it bears repeating: long-distance touring riders need comfort, because a minor annoyance after 50 miles becomes a huge pain after 500 miles.
Are you a year-round rider? Consider how your helmet will deal with changing weather conditions. In cold weather, a fog-resistant faceshield or the option to install a Pinlock system is handy. A quickly learned secret to the trade: “anti-fog” coatings wear off over time, but Pinlock is forever! These two-part systems use a Pinlock-ready shield along with a Pinlock insert to provide an additional layer on the inside of your faceshield that prevents fogging. In warm weather, better venting or the convenience of a modular helmet may be more important.
The more you plan to ride, the more it makes sense to buy a quality helmet that will stand up to daily use and give you a full five years of service.
The occasional, short-distance rider may be served quite well with an inexpensive lid. It's all about matching what and how you ride with what you put on your head.
Considering safety ratings
Now let's talk about the downside of motorcycle helmets: literally, what happens when you go down? You may love your helmet for its cool graphics, but you need to know it will do its job when it counts. There has been a lot of discussion in recent years about safety standards for helments, so let's look at the basics.
QUALITY CONTROLYamaha helmets are manufactured under strict quality control to ensure that it meets the national and the international safety standards. Our state of the art testing laboratory is capable of testing helmets conforming to all the standards of world including DOT, SNELL 2000 (U.S.A), ECE 22.05 European, British, TCVN 5756 Vietnamese and Bureau Of Indian Standards (IS: 4151).